A five game weekend of glorious MeG action.
Campaign is run by my local wargames society, and since I've been spearheading MeG there since the playtest days, this was our second year of the competition. Campaign works with three player teams, each playing in a theme.

This year's themes were 'Rise and Fall of Carthage','The Crusades', and 'The Eastern Lists'. Since I had a Samurai army ready to go, and last year Mark got the pick, I chose to put out my 10mm Samurai. Paul got out his Crusaders, and Mark took his Pyrrhic, and a pulled back halfway during game 1, so Pete Simpson stood in for games 2-5 (thanks Pete).
The list...
Basically, the same you've been seeing all this time, except with two bows instead of the firearm armed Tipo.

My opponents: Richard with Northern Tang, Alasdair with Northern Song, Robin with Xi Xia, Matt with Delhi Sultanate and David 'The War Doctor' with his Ming Chinese.
SO, I'm only the foot army then... And as for scouting, yeah, not happening!
Three ultra tough opponents in Richard, Alasdair and Dave, all regular ranking players in any competition. Matt, while new to the game, is a decent player, and would provide a hard game, and Robin, well, Robin had an army that could hurt me, but his recent run of form was not good...
Game 1
Richard and his Northern Tang
Richard one of the originators of the rules and lists, an all round gentleman and a very tough proposition to face. I have played him previously, and scored a massive four points from him. Could I change?
PBS went okay, but scouting saw me being outscouted by 110%! SO, my usual ambush tactic was off then...

Corner hiding anyone? Not my style, and that village will never do.

Richard's deployement.

Will Richard's prayers to his dice gods shortly to be answered?

Closing fast, initial skirmishes go Richard's way.
 But by the end, I had managed to scrape an 8-5 draw, my highest ever score against him!

Game 2 vs Alasdair and his Northern Song. Nasty combind polearm/crossbow units with an attached two-handed-cut&crush per unit!
Deployment was as Barker intended!

To the left, three of his units take on my Samurai, in the centre, many many fights, not all going my way!
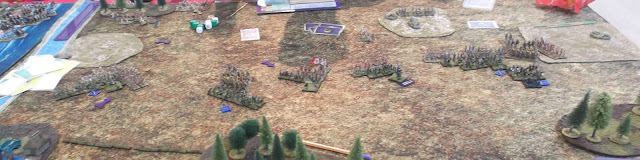
"I know, let's try to rescue the Samurai, again!"

Pretty village, but needs cherry trees in bloom!

A 15-4 loss. Aginst Alasdiar, I was happy with that.
Game 3: Vs Robin Spence and his Xi Xia
Robin decided to flank march, with infantry! Brave move! Especially as you need three red cards to do it! I knew almost immediately which flak that would be on and rushed to redeploy to the left. On the right,Robin threatened wit two lancer units.

Unfortunately for Robin, this was the flank I had my two powerbow armed, skilled cavalry units (so +2 to shooting), which he then proceeded to charge!
Never a good idea. Unit of six dispatched instantly! And this was only turn 2!!!
There was nothing left apart from a haze of blood, a horse riding off in a random direction, and inexplicably, a chicken!
Robin tried plan B, charge my spears with his cavalry. Yeah, that wasn't going to end well for him either!

 My superior spears and average spears hastily swapped places.
On the right, my Samurai were on pinning duties, while my archers and spears tried to work out Robin's flank attack plan.... For about 8 turns... he must turn up soon... We're on the clock you know...

Ohm, there they are! Three units of infantry. Time for the fightback to begin!

Multiple contacts! My samurai archers were in big trouble! In the wood, my archers and spears started chewing lumps out of Robin's foot, who cares if you can't use your spears, when you're superiors!

But two units each square off in the woods. Multiple contacts in the centre, with Robin's catafracts charging my superior spears.

The catafracts being ground down, aided by the allied general, they would not last long.
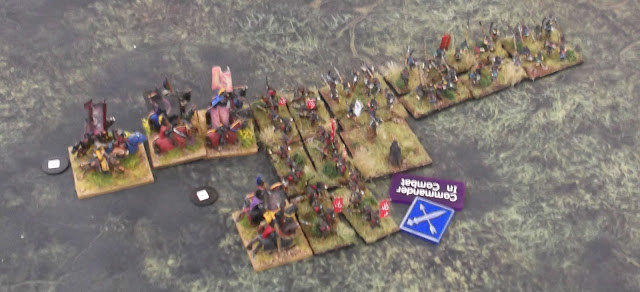
And turning to face, eight stands of mounted samurai hammer into Robin's lancersthat had broken through one of my units, after shooting down three of their stands.
 Robin would break, giving me a 15-4 win!
Game four, vs Matt Haywood's Delhi Sultanate.
Many horse archers, it would be a case of who could get the other first.
Me trying to be clever...

Almost on each other! Unfortunately I left my Samurai foot with their flank exposed, and Matt's lancers piled into their flank, time to play "Save the Samurai, again!"
 Matt would cannily play 'fire and retire' vs my spears, I was hoping to get a few units on bad cards, but it didn't happen! Only the central cavalry would break...

Still there, look!

Huge crunching clash of lines, with many shots on the way in! Fingers crossed! And still there!

Still still there! My archers rush to rescue the Samurai! One of my cavalry sell themselves dear on the left flank while their twin try to and move on Matt's rear.

Two units contacted, could the horse hold? The archers contact the lancers rear. (Hint, the cavalry didn't last)

In the centre, both sides are extremely fragile, with lots of units on the verge of leaving the battlefield.

A last ditch effort to catch Matt
 But he shot my spears to the right away, for a 2-15 loss. Every single unit of his was damaged and a few more lucky rolls and it could have been an entirely different result, but I broke after a series of cascading KaBs. Great game, and could have swung the other way so easily.
Game 5 vs David 'The War Doctor' Parish
Oh look, more Chinese! Thjs time, Ming! An army almost identical to the other two I had fought, mixed packs of crossbows/billmen and many decent cavalry. This would be another hard grind. The thing with fighting David is that no matter the result, it will always be a superb game!
Deployment: Ambushes out, solid line of bows to right of centre with the allies out on the flanks with a large hill to hide on.

Cavalry spring from the left, looking for tasty targets (unprotected horse, yes please), the samurai archers spring from the centre wood. The bows look on, hoping not to get involved!

What a load of bullocks! David pinned my centre with expendable cows, laden with gunpowder! I had met cows at Rollcall, and wasn't that keen on facing them down! Even an 'S' causes a kill, nasty! My Samurai faced off against his 'dare-to-die' troops, it was all about to kick off!

For some reason, I split my cavalry, aiming at his, trying to get a kill. His artillery was, basically, ineffective, what points could I pick up here?


As the sun streamed into the Centre:MK, the light shone on the righteous... but which of us was more righteous?

The archers charge in, the spears charge the cows, and it was time to commit to the fight.

I even attacked David's cavalry on the flank, a risky move against bow-armed horse (as I had found in the last game, but to get points you need to kill things!

But, my cavalry had minced a unit of Mongols (unprotected, superior vs average, and a general, red vs white) they smashed into the Ming camp. If a camp falls it can cause a Kill a Base test on any unit of the enemies army...

David got his infantry back into my spears, as his cavalry broke away from my spears, who had taken an awful lot of archery damage. Their lifespan was going to be somewhat limited.

In the centre, the camp fell, my other cavalry fell, but my spears broke through, we had already claimed one set of guns, and the engineers were taking them for the Shogun in triumph! The KABs effected every one of his units EXCEPT the ones I needed to save my bacon! Gah!

The Samurai fell (again) the bows were sandwiched by two of David's combined foot units, I was four units down ,and in a precarious situation (breaking on 5 units, doom and gloom)!

As time was called, I had David breathing down my neck, I was in big trouble.
 9-10 to the War Doctor, an utterly tight, hilarious game, with many tight squeaks! (Camp is two points, the artillery is one, the cavalry was two, the 'Dare-to-Die' were two, and me surviving was two more). As I said, always a close and enjoyable game vs the War Doctor!
So, what does this all mean, it means that with Paul dominating the Crusades, and Pete defending well the Carthaginians pool (both of us scored 35 points, I was second lowest in my pool, but a pool with four great players), we had managed to hang onto third place, and were actually chasing the second place players too! We won the chocolate soldiers!
And I avoided the wooden spoons!

Campaign is run by my local wargames society, and since I've been spearheading MeG there since the playtest days, this was our second year of the competition. Campaign works with three player teams, each playing in a theme.

This year's themes were 'Rise and Fall of Carthage','The Crusades', and 'The Eastern Lists'. Since I had a Samurai army ready to go, and last year Mark got the pick, I chose to put out my 10mm Samurai. Paul got out his Crusaders, and Mark took his Pyrrhic, and a pulled back halfway during game 1, so Pete Simpson stood in for games 2-5 (thanks Pete).
The list...
Basically, the same you've been seeing all this time, except with two bows instead of the firearm armed Tipo.

My opponents: Richard with Northern Tang, Alasdair with Northern Song, Robin with Xi Xia, Matt with Delhi Sultanate and David 'The War Doctor' with his Ming Chinese.
SO, I'm only the foot army then... And as for scouting, yeah, not happening!
Three ultra tough opponents in Richard, Alasdair and Dave, all regular ranking players in any competition. Matt, while new to the game, is a decent player, and would provide a hard game, and Robin, well, Robin had an army that could hurt me, but his recent run of form was not good...
Game 1
Richard and his Northern Tang
Richard one of the originators of the rules and lists, an all round gentleman and a very tough proposition to face. I have played him previously, and scored a massive four points from him. Could I change?
PBS went okay, but scouting saw me being outscouted by 110%! SO, my usual ambush tactic was off then...

Corner hiding anyone? Not my style, and that village will never do.

Richard's deployement.

Will Richard's prayers to his dice gods shortly to be answered?

Closing fast, initial skirmishes go Richard's way.


Game 2 vs Alasdair and his Northern Song. Nasty combind polearm/crossbow units with an attached two-handed-cut&crush per unit!
Deployment was as Barker intended!

To the left, three of his units take on my Samurai, in the centre, many many fights, not all going my way!

"I know, let's try to rescue the Samurai, again!"

Pretty village, but needs cherry trees in bloom!

A 15-4 loss. Aginst Alasdiar, I was happy with that.
Game 3: Vs Robin Spence and his Xi Xia
Robin decided to flank march, with infantry! Brave move! Especially as you need three red cards to do it! I knew almost immediately which flak that would be on and rushed to redeploy to the left. On the right,Robin threatened wit two lancer units.

Unfortunately for Robin, this was the flank I had my two powerbow armed, skilled cavalry units (so +2 to shooting), which he then proceeded to charge!
Never a good idea. Unit of six dispatched instantly! And this was only turn 2!!!
Robin tried plan B, charge my spears with his cavalry. Yeah, that wasn't going to end well for him either!


On the right, my Samurai were on pinning duties, while my archers and spears tried to work out Robin's flank attack plan.... For about 8 turns... he must turn up soon... We're on the clock you know...

Ohm, there they are! Three units of infantry. Time for the fightback to begin!

Multiple contacts! My samurai archers were in big trouble! In the wood, my archers and spears started chewing lumps out of Robin's foot, who cares if you can't use your spears, when you're superiors!

But two units each square off in the woods. Multiple contacts in the centre, with Robin's catafracts charging my superior spears.

The catafracts being ground down, aided by the allied general, they would not last long.

And turning to face, eight stands of mounted samurai hammer into Robin's lancersthat had broken through one of my units, after shooting down three of their stands.

Game four, vs Matt Haywood's Delhi Sultanate.
Many horse archers, it would be a case of who could get the other first.
Me trying to be clever...

Almost on each other! Unfortunately I left my Samurai foot with their flank exposed, and Matt's lancers piled into their flank, time to play "Save the Samurai, again!"


Still there, look!

Huge crunching clash of lines, with many shots on the way in! Fingers crossed! And still there!

Still still there! My archers rush to rescue the Samurai! One of my cavalry sell themselves dear on the left flank while their twin try to and move on Matt's rear.

Two units contacted, could the horse hold? The archers contact the lancers rear. (Hint, the cavalry didn't last)

In the centre, both sides are extremely fragile, with lots of units on the verge of leaving the battlefield.

A last ditch effort to catch Matt

Game 5 vs David 'The War Doctor' Parish
Oh look, more Chinese! Thjs time, Ming! An army almost identical to the other two I had fought, mixed packs of crossbows/billmen and many decent cavalry. This would be another hard grind. The thing with fighting David is that no matter the result, it will always be a superb game!
Deployment: Ambushes out, solid line of bows to right of centre with the allies out on the flanks with a large hill to hide on.

Cavalry spring from the left, looking for tasty targets (unprotected horse, yes please), the samurai archers spring from the centre wood. The bows look on, hoping not to get involved!

What a load of bullocks! David pinned my centre with expendable cows, laden with gunpowder! I had met cows at Rollcall, and wasn't that keen on facing them down! Even an 'S' causes a kill, nasty! My Samurai faced off against his 'dare-to-die' troops, it was all about to kick off!

For some reason, I split my cavalry, aiming at his, trying to get a kill. His artillery was, basically, ineffective, what points could I pick up here?

Over on the right, we spent a lot of time staring at each other!

The 'Dare to Die' boys live up to their name, they did not fear death. Infact, they appeared to welcome it and soon broke in combat against my superior melee expert samurai. But again, I had left my blue armoured nutters with an exposed flank, time for the archers to play 'Rescue the Samurai, AGAIN'!

As the sun streamed into the Centre:MK, the light shone on the righteous... but which of us was more righteous?

The archers charge in, the spears charge the cows, and it was time to commit to the fight.

I even attacked David's cavalry on the flank, a risky move against bow-armed horse (as I had found in the last game, but to get points you need to kill things!

But, my cavalry had minced a unit of Mongols (unprotected, superior vs average, and a general, red vs white) they smashed into the Ming camp. If a camp falls it can cause a Kill a Base test on any unit of the enemies army...

David got his infantry back into my spears, as his cavalry broke away from my spears, who had taken an awful lot of archery damage. Their lifespan was going to be somewhat limited.

In the centre, the camp fell, my other cavalry fell, but my spears broke through, we had already claimed one set of guns, and the engineers were taking them for the Shogun in triumph! The KABs effected every one of his units EXCEPT the ones I needed to save my bacon! Gah!

The Samurai fell (again) the bows were sandwiched by two of David's combined foot units, I was four units down ,and in a precarious situation (breaking on 5 units, doom and gloom)!

As time was called, I had David breathing down my neck, I was in big trouble.

So, what does this all mean, it means that with Paul dominating the Crusades, and Pete defending well the Carthaginians pool (both of us scored 35 points, I was second lowest in my pool, but a pool with four great players), we had managed to hang onto third place, and were actually chasing the second place players too! We won the chocolate soldiers!
And I avoided the wooden spoons!


Comments
Post a Comment