Regular readers (are there any?) may remember Mark and I had initially fought this combination earlier in the year, and this was the promised rematch. It had been delayed by snow, but now, in the first days of May, Henry VIII, King of England, faced an invading army of Uesgui Samurai. We had swapped roles, this time I was the Tudors to Mark playing the Samurai, an army he had tried before vs Paul, and had some success, so this would be interesting...

And it was!
The Armies
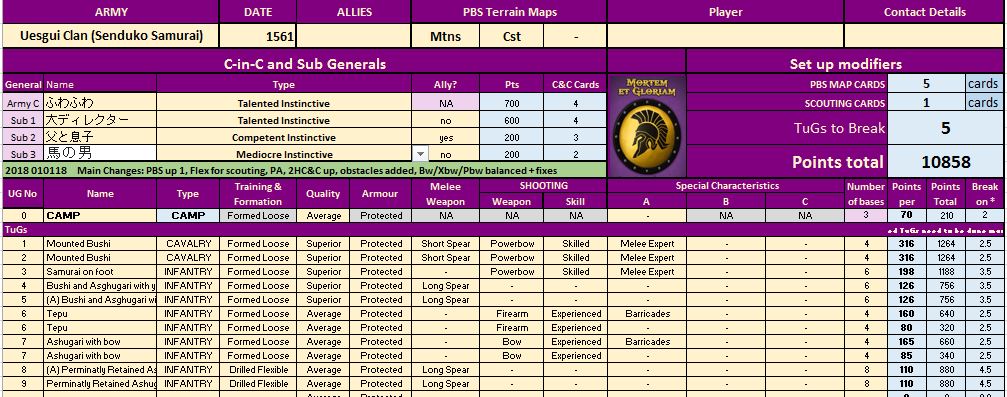
Mark is an excellent player, who can take any force and use it to his advantage. All figures from the Pendraken Samurai range, except the general, who came from Dark Sword (long story, best not to ask).

The Tudors, based on the forces I had painted up for Field of Glory Renaissance. This is an early Tudor force,, from his continental adventures in 1513 when Henry was keeping up with continental technology. The army is based upon a solid core of longbows, billmen and knights. All figures by Pendraken, except Henry himself who is from the Assault Group 28mm Tudor range.
Depolyment:
I won the roll off, chose to defend and forced Mark into the plains, keeping his terrain options limited. I also outscouted him by 80% (one black card vs 2 red, Henry knew his ground). The main terrain feature was a series of hop fields (Tall, standing crops) to the Samurai left. Mark chose to anchor his forces on these, placing his barricaded troops in an arc that would allow him to take a defensive stand.
The Tudors deployed their pikes in the middle, as a pining force for the better Samurai, their longbows to the left, supported by one bill unit, the other bills and two units of Gentlemen retainers to the right. The knights were kept as a reserve until I could work out what Mark was planning with his lethal cavalry and Samurai archers.

My plan, look at those cards, was to swing right and left, pin to the front. Somehow, it never quite happens like that. The cavalry all countermarch right, as I can see trouble brewing as Mark's Samurai cavalry are moving that way too.

The elite of the British gentry sit astride their noble steeds, while the Yeoman of the Guard and the Duke's retinue struggle through the hop fields to deal with Mark's cavalry. However, the ashugari who had been in reserve had suddenly sprung into life, switched to lose formation, and were threatening.

Contact is made!
However, due to lack of cards and range on The Duke's part, and a nicely positioned countercharge by Mark, two units slammed into my heavily armoured foot, catching them at a disadvantage (+2 to Mark). Both generals engage each other too. I can only hope my reserve does the business next turn!
My faster knights stream down the lines of my Billmen and archers, in a vain attempt to catch Mark's archers on his right who had come forwards from their barricades to engage the English longbows in a shooting duel. My Pike faced down two units of Bushi and Mark's elite samurai, while the hope fields hotted up. The red dice was the Duke taking a wound, now he was mediocre!

A close up of the formation switching!

Oh! The Yeoman of the Guards disintergrate, leaving the Samurai cavalry to hold off while the Ashuragi hit my retainers. Again, they cause massive damage on the way in. Hopefully this lot will last a little longer.

Erm, that will be a resounding NO!
I'm already two units down, to the loss of two of Mark's bases. Plus the Duke finally succumbed to old age (he was 74) and fell from his horse, leaving my knights stranded with their flanks exposed.

Mark's pursuit crashes into the flank of the British nobles, who taken by surprise only suffer one base lost, but they cannot hold out long!

And my chances of reacting to this flank charge, somewhat limited, as the Duke's esquire tries to rally his Lord's men, they appear reluctant to commit.

Seconds later, after dealing out significant losses (1 stand) to the ashugari, and being flanked by superior Samurai cavalry, they evaporate! 3 units down, only two left until the army breaks. Mark has still only lost 3 stands!!!

And sensing victory, his cavalry swoop towards the camp!

Leaving nothing but abandoned counters, rules sheets and dice behind them!

Meanwhile, in the centre, Henry has taken matters into his own hands. The Pikes and bills on the left crashed into the steady line of Samurai spears, this was purely a matter of quality vs quality! To stop his superior archers flanking the pike block, their halberdier had contacted, but his meant it was fighting at -2, so each kill the Samurai inflicted was redirected into the right hand pike column. I tried charging his Tepo, who had come out from behind their barricades, and their shooting (double slowing effects) had stalled my billmen long enough for Mark's other superior cavalry to catch them in the flank. It wasn't a case of if I would lose now, but when!
Henry himself, in his devine majesty, took command of a unit of knights, and charged them into teh Samurai archers line, many brave flowers of English chivalry were mown down by Japenese arrows before they reached their target, but the lancers charge felled many oriental adversary, suddenly, might affairs be finally turning the English way?

Seeing a flank from teh lighter English knights, the bow armed ashuragi turned aside from their duel with the English longbows, and faced the enveloping knights, away from their protective barriers. In the centre, the Pikes, supported by great numbers of Billmen, continued to grind away at Bushi units, who were suddenly looking as vulnerable as their Samurai neighbours. Could Henry force a breakthrough here in very centre of the Japanese Elite?

Suddenly, it happened! The elite Samurai shattered under the weight of western armour, however, it was too much for the small unit of noble horse, who also cracked under the pressure and fled!


But disaster! Henry, in his moment of triumph, was suddenly stuck down. Was it a stray shot from a noble archer? A lone warrior taking down the king in mortal combat? Was he set upon by an unknown, dark clad, assassin from the midst of the fleeing Samurai ranks? In the taverns and markets of Spittlefields, some say, when his body was recovered from the field, he had 'ner a scratch on him' 'apart from his head being completely missing'!

Undaunted, his men fought on, breaking another unit of Bushi (Latest score: 4-2 to the Samurai. In the Northern derby, Alwick 7 - Berwick 7...)

But on the flank, the Ashuragi archers, seeing the approaching threat, shot their last shot into the English knights, who fled! This gave Mark a well deserved 15-4 victory.

"NOW YOUR MAJESTY, WE HAVE MATTERS OF RELIGION TO DISCUSS!"

How did I lose?
Easily.
I put my archers on the wrong flank, I sent too many small units into terrain where they could not fight, I lost generals at the wrong moment, and basically loused it up!
It was interesting to see my army in someone else's hands. Mark played a purposely defensive game, forcing me to come to him. I could mass but my right flank was terminally weak. I am positive that the Samurai will do okay next weekend, but will they do well enough?
Great game, full of laughs and certainly a head scratcher for the Tudors.Oh well, I'm off to rewrite that list then!
Comments
Post a Comment